Author Topic: Jim Martin  (Read 163745 times)

0 Members and 2 Guests are viewing this topic.

Offline el_flechador

  • *
  • Posts: 459
  • Karma: 0
Jim Martin
« Reply #150 on: March 05, 2005, 01:01:39 PM »
WOW definately one of the pinnacles of what can be done to the humble veedub :rockon:  

Offline Swartz

  • Full Member
  • Posts: 290
  • Karma: 0
    • http://
Jim Martin
« Reply #151 on: March 05, 2005, 01:24:31 PM »
Looks awesome!
Everything takes time

Offline jim martin

  • If something is priced to good to be true ,do yourself a favour. DONT be a IDIOT and BUY IT
  • *
  • Posts: 1406
  • Karma: 1
    • http://www.dialedinperformance.com
Jim Martin
« Reply #152 on: April 23, 2005, 08:04:12 PM »
well like i said i got my garage ready to rumble but just couldn't find the time .and lately i'm stressed out so i've been burning the late shift to take my mind of things and make some progress.what i did was when i parked the car last year i went to every section of the car and made list of what needs to be done in each area.its all the small things that need doing to be  100 % complete and if i left the last 10% i would never do them . man there was a lot of small things to do .some small and take seconds and others take all day.but i can safely say i'm 99% my way through all my lists .
lots of small things under the hood but the most important was to finnish of the breather nicely and ditch the coiled rubber hose.

lights aimed ,and finally got that hood molding on !!i must of spent 6 days finnishing everthing off just under each of the frt fenders and hood,but its done and safe.

with all the door panels out wax was sprayed in all the seams an since the panels were out i reworked the outer window scrapers to make them a even 1/4\" and give a cleaner look . the running boards were refit and butt nicely to frt and rear fenders. like i said those to-do list of small things was huge but i can move on to more fun stuff now.                                                                                                          
as you can see i'm reworking a lot of electronics in order to make it less clutered but more important easier to work on,what a mess

got me a new seat or at least the pad ,not sure if i need it but it can't hurt to have a good support for racing!

ok , now that all the other b.s is out of the way lets look at the good stuff.like i said i'm keeping my mind busy lately so at 10.00 pm the other night i went and pulled my motor so i could install these new cb mounts i got from airspeed.anyone running these mounts be warned that the material on top takes a long time to compress and if you just install them i will garantee the mounting bolts will loosen off.best to sinch them up real tight leave them overnight and let them compress and shape to the trans or heat them with a hot air gun then snug them up. and again leave them to form for a day .after that loctite the mounting bolts and tighten well.
in a earlier post i had made these trick little brackets that sat inbetween the trans and the mounts to lock the rear mount into a solid arrangment but they don't work with this style of mount due to the studs being to short but, i have now come up with a new part that will allow you to run stock rubber mounts then in 5 mins convert to a solid rear mount.pictures to follow when i get the prototypes tested!!

since my motor was out and there was a bit of oil seapage from #3 lower cylinder i decided to pop the head off and fix it as well as take a look at how things were holding up.
first on the list was a closer look at #4 cylinder .originally  i thought i had a manifold gasket leak but it turned out to be a cracked intake manifold.you can see if it was left for to long how running that cylinder  lean could damage it.lucky its ok and the valve seat surface is good.you can see how carboned up the combustion area is  from running  to rich a fuel mixture .

here is a good way to know how your motor is doing,next time you replace those leaking exhaust  manifold gaskets take a look at the exhaust valve stem.if its white you are lean, they should be tan  not like this, ouch

now that i got both heads off and i removed all the cylinders and yes my child and albert rings did seal but will show some neet photos on how much rings rotate around the pistons later on .not what i expected.
WARNING THE NEXT PHOTO IS NOT NICE TO SEE , LOOK CLOSE AT THE LIFTER

well , looks like i'm lucky to get 3 months out of a cam and lifters .well 2 cams and 16 lifters later we will try again.i will tell you this coming up winter i will be doing major motor upgrades and will be using a composite lifter for sure and end this cam bullshift for once and for all.
--well its good to be back and i should be rolling soon .i will post some motor assembley stuff  and keep your eye's peeled for the
RAM-AIR system and a bunch of other electronics and tricks

here is a picture of the back up motor i just put together.its a bit small but it packs a punch
« Last Edit: December 01, 2008, 10:08:07 PM by jim martin »


the 'WOK" June 2006 Hot VW's feature car  9.830 sec at 143.44 mph.
Sponsored by : LUCAS OIL PRODUCTS   www.lucasoil.com
KROC head porting services
Dialedinp

Offline ScreamnStroker

  • Full Member
  • Posts: 587
  • Karma: 0
Jim Martin
« Reply #153 on: April 23, 2005, 08:20:20 PM »
Quote
I like it!!! :rockon:  :rockon:  

Offline Shane

  • Full Member
  • Posts: 5843
  • Karma: -2
  • FTG Racing
    • Pointblank Installations
Jim Martin
« Reply #154 on: April 29, 2005, 10:39:05 PM »
Atleast yyou know where the power is at!!!
I am honered you are sooooo scared to put a time to that car!! ;)  
FTG Canada
Brown Sugar
2014  8.97 @ 157mph

Offline jim martin

  • If something is priced to good to be true ,do yourself a favour. DONT be a IDIOT and BUY IT
  • *
  • Posts: 1406
  • Karma: 1
    • http://www.dialedinperformance.com
Jim Martin
« Reply #155 on: May 29, 2005, 08:05:35 PM »
well sorry for the lack of update photos but, because of my familys health concerns free time is hard to come by so i've been fitting in what i can ,when i can so photo taking has not been at the top of the list .this has lead to many late nights but, got to admit it's very peacefull outside at 2.00 am. but even with my plate full i've got to drive my car on my 40th in june.
well i've had a few setbacks but the most frightfull was apon removing my gland nut my crank threads were damaged.end result was to roll the dice which ment running a 28/1.5 tap to chase the threads make a jig to support the crank and flywheel on the floor .set the wedgemate install a new fly wheel seal and torque it up and see if the threads hold .well 500 ft/lbs later it was decided to risk it in the car.fingers crossed it holds !!!!
-finnished my upgrades to my wiring which ment sorting it all out and finnish prewiring for futre 2nd nitrous stage as well as fuel injection.some components are moved to new locations and everthing is easly upgraded or tested if need be.

since i love electronics and tuning i decided to order a custom j&s safeguard unit.this unit is a performance ignition retard unit .its modified to allow direct ignition data logging into my LM1 as well as allow a 2nd stage of ignition retard .made a sweet little braket to set it on with enough space beside it for futre placement of a fuel injection ecu.

unit requires a knock sensor to be mounted i decided a aluminum mount behind the shroud was the best place to put it.can't wait to get this hooked into the LM1 and start testing with it

well engines in and after 2 runs with stock rockers at 2000 rpm for 20 min each i dumped the oil installed the 1.4 and headed out for a test drive :D
took some a/f readings and made a jetting change and hit aircare.well it passed with flying colour so now i'm insured and ready to start tuning and final assemble of a few things.so far engine feels strong and rev's easily to 7500 rpm.time will tell if the flywheel stays put

well you can see i got my alternator in and have sorted out the belt alinment issue .take a look at the trick billet aluminum upper pulley.very nice piece  from airspeed.
now that it is insured and runs i can slow down a bit . i will take a few more photos as i progress with the tuning/ram - air and solid mount set -up.
see you on the streets
« Last Edit: December 01, 2008, 10:09:54 PM by jim martin »


the 'WOK" June 2006 Hot VW's feature car  9.830 sec at 143.44 mph.
Sponsored by : LUCAS OIL PRODUCTS   www.lucasoil.com
KROC head porting services
Dialedinp

Offline silas

  • *
  • Posts: 6822
  • Karma: 20
    • Some cool videos...Check them out!!
Jim Martin
« Reply #156 on: May 30, 2005, 04:34:00 PM »
right on.  :rockon:

way to go jim.

so...i'm trying to wrap my head around this, so please correct me if i'm wrong. the knock sensor is used to determine when & if there is premature ignition in the combustion chamber, and then retards the timing accordingly? or does it determine engine vibration? does it read cylinder by cylinder? if so, with your lm1, will you be able to see exactly what is happening in each cylinder at different rpms, or does the lm1 do that allready?
 

Offline jim martin

  • If something is priced to good to be true ,do yourself a favour. DONT be a IDIOT and BUY IT
  • *
  • Posts: 1406
  • Karma: 1
    • http://www.dialedinperformance.com
Jim Martin
« Reply #157 on: August 22, 2005, 11:41:48 PM »
well lets go backwards for a while.just found some old photo's from 3 years ago and since i have a new toy at home i was able to scan them.
SO YOU WANT TO CHOP A CAR,WELL HERE YOU GO!!!!

--everbody this is TATES first day on the job.you can see since i had chopped the car years earlier things were a bit easier,new templates were made for the windows and i had allread started to section in the new/old rear oval clip.
first of 6 pieces are out.lets get going.


first sections tacked into place,what a huge help having the templates and old sections to match up to.if only it was all that easy.half of donner roof is on the ground and marked out.left b piller section comes next.


well we move fast at my house.main reason i was able to do alot of prefitting/work on fridays then when tate arrived on sunday he would check my work .if it was ok he would tack it in good and carry on.in this photo b piller section is in as well as c piller section is in but rear clip is waiting triming.
you can see the gaps that already need filling.as well as the old thick filler on the old roof,thats why it had to be rechopped.i was able to use alot of the old rof to fill pieces in luckly.bondo be gone!!

you can see oval clip is waiting trimming and welding.fuel lines are having a nice stretch,wheel arches are good to go.like the old colour?

MONEY SHOT!anyone ever using this photo OWES ME BIG,this is the area everone has trouble with.take your time and it will turn out,good luck here.buy a hammer and dolly

section between all 3 sections are filled and tacked.

quick look at the rear clip .i was lucky because the car was alraedy chopped i could use the old roof shape to aid in the oval sections placement.look close you can see where it was welded in down low.in order to install a rear clip you also need to split it into the inner and outer pieces by drilling out all the spot welds.its the olny way to fit it back in the car.trust me the inner fitting is hell.at this point the inner section is in and also welded to the rear firwall

tada !! left side done.now we can start the right side.you can see i'm trying to keep my freshly done frt suspension clean,not working well.no clip at this point and no dash either.like i said early photos

well time fly by,yeah right.and here it is roof in and welded so its ouside for a peak,car couldn't remember the last time it saw sun shine.12 years or more for sure.look close that door need work at the piller.but the roof line is stunning!!!!

good shot from the rear.getting there.old colour was ford pewter metalic

all i can say is this was a good day.alot of work up to this point,but the primer was laid down.

i can't tell you and its probably impossible for you to understand the amount of time that goes into a roof chop .there is alot more than you can ever think of.hammering drip rails/doors/all inners etc etc.i hate to think back that far.next time you see my car take a look at the  inner roof work very smooth.
here is a great photo car is almost complete had to do a preassemble for sure/primed and waiting for my motor.if you've see my daughter  lately you can tell alot of time has passed from this photo to present

now if you are stupid enough to try this yourself and get stuck ,dont call me i'm done with body work  :D
« Last Edit: December 01, 2008, 10:34:12 PM by jim martin »


the 'WOK" June 2006 Hot VW's feature car  9.830 sec at 143.44 mph.
Sponsored by : LUCAS OIL PRODUCTS   www.lucasoil.com
KROC head porting services
Dialedinp

Offline jim martin

  • If something is priced to good to be true ,do yourself a favour. DONT be a IDIOT and BUY IT
  • *
  • Posts: 1406
  • Karma: 1
    • http://www.dialedinperformance.com
Jim Martin
« Reply #158 on: September 28, 2005, 05:42:35 PM »
well i need to occupy myself somehow so i figured i would do it here.
--recap of my summer.
-MAY, replace another cam and get motor reasembled and take to aircare for some abuse but wind up with a solid 100% pass.
-JUNE,get car running and enjoy a night of cruising for my 40th
-JUNE,head to DGLVK fathers day show .have a great time and wind up with a pair of beautiful trophies,[thanks dglvk!!]
-JULY,birth of my second daughter.   Jessica Isobel Martin
-JULY,decide to head to the track and dial in some jetting .everthing was going along fine until i decided to bring the revs up and preload and launch the car,end of the day :( should of just kept rolling away at the lights.lesson learned racing finds the weak spot in any vehicle .mine was overlooking my engine support bar.
-JULY,pull engine and trans,dissasemble trans and send to rancho for repare ,straighten bent frame horns,dissasemble motor again to repare a damaged #1 main bearing.
-AUGUST,slap motor together figuring that the impact at the track and possible end play problem caused falure[wrong]drive vehicle to GCVWS and end up getting 2 prizes ,the first is a beautiful wall mount trophie and the second is a secret .Shhhh if you know.
-SEPTEMBER,discover while testing new trans mounting and prepareing for a 100 shot day at the track that there is a bad vibration  from my motor.
-SEPTEMBER,pull motor to discover #1 bearing is gone again ,crank is bent and lifter are flaking,everthing is sent for repare and i sit and wait for parts to return.
-SEPTEMBER 28TH,after a long fight with cancer my father passes away.
so you can see its been one hell of a roller coaster summer with many highs and lows can honestly  tell you i'm waiting for 2006 .
--here is a few of my favourite picts of the summer .

my gals

ashley sleeping after a nice icecream cruise.

summer show

trophies

and a few favorite pics


anyway i had a quite alot of people e-mailing me with questions  over the summer,and i know many of them went unanswered as i had my mind on other things.so the best thing to do ,since my motor is litterd all over my floor .is start THE GREAT CANADIAN NITROUS KNOWLEDGED THREAD. we will start with the case and finnish with a 100 shot at the track .and cover everthing thats needed inbetween.


--
« Last Edit: December 01, 2008, 10:40:22 PM by jim martin »


the 'WOK" June 2006 Hot VW's feature car  9.830 sec at 143.44 mph.
Sponsored by : LUCAS OIL PRODUCTS   www.lucasoil.com
KROC head porting services
Dialedinp

Offline Geoff

  • *
  • Posts: 8394
  • Karma: 441
    • http://airspeedparts.com
Jim Martin
« Reply #159 on: September 28, 2005, 05:51:51 PM »
Jim, I just read about your father passing away, I'm very sorry to hear that. I went thru the same thing a few years ago with my Mom.

My thoughts are with you and your family.
Take care.
Geoff.

Offline jim martin

  • If something is priced to good to be true ,do yourself a favour. DONT be a IDIOT and BUY IT
  • *
  • Posts: 1406
  • Karma: 1
    • http://www.dialedinperformance.com
Jim Martin
« Reply #160 on: September 28, 2005, 06:09:13 PM »
thanks geoff  


the 'WOK" June 2006 Hot VW's feature car  9.830 sec at 143.44 mph.
Sponsored by : LUCAS OIL PRODUCTS   www.lucasoil.com
KROC head porting services
Dialedinp

Offline nivag

  • Gavin Lee
  • *
  • Posts: 907
  • Karma: 1
Jim Martin
« Reply #161 on: September 28, 2005, 07:28:23 PM »
That's one hell of a summer... I love the pic of your daughter sleeping in the car, I can't wait to cruise my son/ daughter in my cal looker on beautiful summer day.

Sorry to hear of your dad... best wishes to your family.

Gavin


Offline James Buchan

  • Full Member
  • Posts: 6403
  • Karma: -51
Jim Martin
« Reply #162 on: September 28, 2005, 07:43:14 PM »
Same Jim - I lost My dad in 2000 and it still tears me up - Best wishes buddy, call if you need anything.

Offline Shane

  • Full Member
  • Posts: 5843
  • Karma: -2
  • FTG Racing
    • Pointblank Installations
Jim Martin
« Reply #163 on: September 29, 2005, 05:03:07 PM »
Manda and I send our Condolences... My Dad passed away in '97. Always hang on to the good times...
You need anything man we are there.
 PS I also love the shot of your daughter in the car... :wub:  
FTG Canada
Brown Sugar
2014  8.97 @ 157mph

Offline jim martin

  • If something is priced to good to be true ,do yourself a favour. DONT be a IDIOT and BUY IT
  • *
  • Posts: 1406
  • Karma: 1
    • http://www.dialedinperformance.com
Jim Martin
« Reply #164 on: November 07, 2005, 11:35:42 PM »


after getting 'THE WOK' finnished and attending two car events this summer and because of  the airspeed  forum, i have recieved alot of questions regarding engine assembley,tuning and nitrous etc.so i figured it would be alot of fun to do a complete engine series starting with engine build up and finnishing at the track.there is so much to cover inbetween so i'm hoping this will be a informative topic that will give alot of people an idea of what it takes to desighn,assemble,tune and maintain a stroker motor.this will be impossible to due without mentioning product manufactures ,so i will due my best to give the reasons i choose them.and if you have any questions or comments i will due my best to answer them,so please no e-mails post them here as someone else is probably wondering the same thing you are.
  LETS GET ROLLING.the motor being coverd is the same motor thats been in[and out] of my car over the last few years. it was desighned and buildt as a test/relearning motor that i could base my futre engines from and experiment with tuning aids and performance enhancers and overall it has proved quite durable .but at the same time i have suffered from many mechanical falures.3 cams and lifter sets,piston ring falure and a bent crank.some things you can't control ,just learn from them and carry on and make adjustments along the way. remember speed costs money ,so throw your bently manual out the window , break out the charge cards and lets build a nitrous motor.

tools , tools ,tools ,you don't need alot of special hand tools but you will need some good quality measuring equipment .most are avalible at princess auto,kms tools,lordco, sears etc.

 
this is the reason my motor came apart again.this problem is the same thing they talked about on monster garage,seizing #1 main bearing.for me i could careless about the falure but what caused it ,is the most important.
oil starvation,bent crank,align bore.all these points came up ,and like i said learn from the mistakes.this is like the which came first the chicken or the egg thing.i may never know if the crank bent causing the falure or the crank bending is the result .but i'm sure i've figured it out,later topic.


so the first thing after everthing was dissasembled was inspection of parts.knowing the crank was having a bearing falure ,it was the first thing to check.if you don't have a set of V blocks to rest the crank on to check it ,you can rest the crank in the one case half so that is running on only 2 bearings.#2 and #4 are the best as you can measure the run out on the #1 main journal and the #3 main journal using a dial indicator.the picture really shows how to check it using the dial indicator/magnetic base,just set it to zero and slowly rotate the crank.in this photo the end of the crank was bent .0025 \"from the #2 bearing forward,when i measured it at the #3 journal it was still straight.my theory is the seizing bearing was causing the one end of the crank to bind/lock up ,and with the rest of the crank easily rotating and appling a great deal of force into the rest of the crank ,this caused the bend.seams to make sence.but what caused the seizing bearing?later


this crankshaft is a demello full circle crankshaft,the reason i bought this crank is due to it great reputation for smooth running at high rev's and also because it is the same crank the USA military uses in it combat vehicles.and because of my vehicles weight i wanted more rotating mass [ yes it's heavier than most cranks] to help prevent on line bog when releasing the clutch at the track.you should of heard bob at demello when i told him i bent my crank,anyway he took care of it for me and repared it asap.
sorry should of posted this photo earlier so if your not sure of the lay out of a vw crankshaft you would know what i was talking about.note the 4 main journals are all in a row down the centre and the rod journals are on the outer portion.you can see from the crank centerline to the centerline of each of the rod journals is 41mm for a total of 82 mm total .this means that this crank will move a piston up and down a cylinder 82 mm every rotation.
so why put a bigger crankshaft into a motor? easy, torque produced  from any engine comes from the energy being released from the ignited fuel.so more fuel = more energy =more torque.in the case of a larger crankshaft just think of a syringe.pull up on the plunger and take in 10 cc of fluid,this time pull back on the plunger and take in 20 cc of fluid.you just stroked a syringe ,its the same as going from a stock 69mm stroke to a 82 mm stroke.i think you get it .


well now my crank is back and its time to check and measure it.so back into the case it goes for the same test as before.
this time much better results.dead straight! thanks bob.


this is a better shot of were the dial indicator is set when measuring crank run out.this same procedure is used when checking for a bend/run out at the #3 main journal as well


now that i have a straight crank better check all the journals for roundness and size,in order to do this you need to use a micrometer.before you use any measuring tool it is important to make sure its calibrated.in this case a preset block is inserted between the measuring portion of the micrometer and it is used to calibrate it to zero,look close this tool is out and will need adjusting ,which is done by using a supplied tool to alighn the marks


with my crank suported in the v blocks you can see that i checked the #1 main journal in 3 places.bob did his work and it is perfect measuring at 2.1544\". you need to take your time and measure all 4 main journals and all 4 rod journals using the same technic.record all these measurment as you are going to need these very soon


now we can use the same technic on the cam that we used for the crank.first measure all 3 bearing journals and record there measurments.
in this case they measure 0.9846

hey you got the tools so better check run out on the cam.check it like this as well as support it at each end and put the dial indicator on #2 journal and check for run out as well

now i know i said toss the bently book out.that is because we are building a performance motor and not a stock motor so remember the rules have changed.but in the case of run-out for the crank and cam and crank and cam journal size it is to be used as a referance only
cam run-out=.0008\"max/crank run-out=.0008\"max
lets worrie only about measuring run-out and recording journal diameter's,we will get into the details later
 better measure that new oil pump housing and make sure its round.again record the measurements.not bad .0001\"out of round


you can see i started a chart with everthing i have measured .this is going to be a huge help when we start measuring out the case  and working out oil clearances and end play etc.don't worrie it will all come together


well i think its a good start and i hope easy to follow , i can't believe all we did was measure 3 things .next is the case
« Last Edit: December 10, 2008, 11:15:01 PM by jim martin »


the 'WOK" June 2006 Hot VW's feature car  9.830 sec at 143.44 mph.
Sponsored by : LUCAS OIL PRODUCTS   www.lucasoil.com
KROC head porting services
Dialedinp

Offline silas

  • *
  • Posts: 6822
  • Karma: 20
    • Some cool videos...Check them out!!
Jim Martin
« Reply #165 on: November 08, 2005, 07:31:48 PM »
very cool jim. if you need a hand let me know.  ;)  

Offline Mowser

  • "You know, Hobbes, some days even my lucky rocketship underpants don't help. " Calvin
  • *
  • Posts: 1292
  • Karma: 1
Jim Martin
« Reply #166 on: November 08, 2005, 07:54:00 PM »
Wow, Great idea Jim.  Hey Geoff / Jason, how bout getting this guy his own spot in the AirSpeed Projects forum so everyone will see this?
'59 Beetle Ragtop
'59 15 Window

Offline slammedbus

  • Full Member
  • Posts: 2792
  • Karma: -1107
    • Check us out on Facebook
Jim Martin
« Reply #167 on: November 08, 2005, 09:28:02 PM »
That is a good idea Mo.


Hey Jim. I always explain torque advantages from a stroker to my students like this. You exert a force on a lever that is 69 mm long and get X amount of torque. What would happen to the amount of torque if I made that lever 82mm long and applied the same amount of force??  Seems to sink in to the little uns.
Wreck Amended Restorations

Honest work for honest rates. Done by people that are just as excited to see your dream hit the road as you are.

Billyisgr8

Jim Martin
« Reply #168 on: November 08, 2005, 10:26:23 PM »
Excellent...how many people build their engines and just throw together parts...This is a good how to session for proper engine building.  

Awsome how to job.

Kevin

Offline jim martin

  • If something is priced to good to be true ,do yourself a favour. DONT be a IDIOT and BUY IT
  • *
  • Posts: 1406
  • Karma: 1
    • http://www.dialedinperformance.com
Jim Martin
« Reply #169 on: November 11, 2005, 12:44:12 AM »
Quote
That is a good idea Mo.


Hey Jim. I always explain torque advantages from a stroker to my students like this. You exert a force on a lever that is 69 mm long and get X amount of torque. What would happen to the amount of torque if I made that lever 82mm long and applied the same amount of force??  Seems to sink in to the little uns.
great example !

remember that a crankshaft is the component that turns liner piston motion into rotation.and rotation is measured in torque.
i think we are at the point where engine displacement becomes a topic.engine displacement is basicaly the amount that is displaced from the point at where the piston starts its movment to the point at which it stops moving,that total volume times the number of cylinders is the total engine displacement and vw engines seem to be measured in cubic centimeters [cc's] .there is many online engine displacment calculators avalible ,so look one up and plug in some bore and stroke numbers and you can see quickly what effects what.so go back to the syringe for a moment as its easy to visualize,if you increase the size of the plunger [piston] or increase the amount you pull the plunger back [crankshaft],you have increased the amount of fluid you have drawn into the syringe[displacement].now we go the other way.when the fuel is ignited it causes the piston to be pushed back down the cylinder,the bigger the piston the greater the force pushing on it.the piston is connected by a rod which in turn is connected to the outer journals of the crankshaft.and the farther away the outer rod journals are away from the main bearing journals the greater the leverage will be .and that leverage from the rotating crank is measured in torque.so by increasing the crankshaft or the piston size we are going to generate more torque.remember that there is no replacement for displacement ,so build them big and burn lots of fuel because the power comes from the fuel
,great to see some input.

since i'm still in a measuring mode and my case will not be back till next friday i finnished up premeasuring my crankshaft endplay.first the reason this is a little harder to do is because this is a wedgemated crankshaft.which means the end of the crank which the flywheel bolts onto has a taper machined onto it and the flywheel has the mating surface welded up and machined to the exact same taper as the crankshaft.when these two pieces are put together and torqued they become a almost inseperatable piece.if you have ever tried to take a tie rod off of your steering knuckle you know how strong a taper fit can be.so since it's alot of work to seperate a wedgmate its best to try to minimize the amount of times you need to do it.as well you can damage the wedgemate surfaces from repeat assembley/dissasembley.
you can see here the actual taper machined into the crankhaft end.and like i said the flywheel has the mirror image of it machined into it.

first install your #1main bearing onto the crank and using your depth guage measure down to the bearing.i try this in a few differant spots and take the average reading as its very hard to get a 100%same reading at all spots you most likely will be a .001\" out on avg.you see i got .368\"

then measure with your depth guage spanned across the flywheel down to the mating surface of the flywheel.we get 0.3265\"

now what we do is minus the two numbers and come up with the dimension between the end of the #1 bearing and the flywheel we get.0415\"
now inbetween the two parts you need to run a min of 3 shims this will set your endplay as well as keep the flywheel from contacting and destroying the bearing.now i'm going to run .007\" endplay so i needed to get .0345\" in shims.what luck i have 3 that work out perfectly.shims are avalible in all kinds of thicknesses and last time i was at airspeed i picked up  a whole bunch of sizes so i would have a good assortment at home when the time came.

we will see how good this premeasurment works out after the bearing is preloaded in the case and the flywheel is torqued up.i'm interested to know myself.again the measurements are marked down on the chart .might start measuring out the rods while i wait for my case.
« Last Edit: December 10, 2008, 11:16:41 PM by jim martin »


the 'WOK" June 2006 Hot VW's feature car  9.830 sec at 143.44 mph.
Sponsored by : LUCAS OIL PRODUCTS   www.lucasoil.com
KROC head porting services
Dialedinp

Offline Mike Scott

  • Full Member
  • Posts: 727
  • Karma: 0
Jim Martin
« Reply #170 on: November 11, 2005, 10:20:32 AM »
I love you Jim

Offline jim martin

  • If something is priced to good to be true ,do yourself a favour. DONT be a IDIOT and BUY IT
  • *
  • Posts: 1406
  • Karma: 1
    • http://www.dialedinperformance.com
Jim Martin
« Reply #171 on: November 11, 2005, 07:18:37 PM »
i hope this is easy to follow,i'm trying to make it so anyone can understand no matter what level.
also you may have noticed i measure in inches instead of metric,sorry i have always measured engine parts in inches mainly due to 99% of machine shop's measure in inches and when things are being farmed out you better speak the same language.  
« Last Edit: December 10, 2008, 11:26:06 PM by jim martin »


the 'WOK" June 2006 Hot VW's feature car  9.830 sec at 143.44 mph.
Sponsored by : LUCAS OIL PRODUCTS   www.lucasoil.com
KROC head porting services
Dialedinp

Offline James Buchan

  • Full Member
  • Posts: 6403
  • Karma: -51
Jim Martin
« Reply #172 on: November 11, 2005, 08:08:04 PM »
You around tmrw Jim - I'll give ya a shout in the early PM if you are.

Offline jim martin

  • If something is priced to good to be true ,do yourself a favour. DONT be a IDIOT and BUY IT
  • *
  • Posts: 1406
  • Karma: 1
    • http://www.dialedinperformance.com
Jim Martin
« Reply #173 on: December 01, 2005, 12:12:51 AM »
THE CASE,this is probably the most overlooked part in any build ,but it is the most important.in my opinion with aftermarket parts being made everywhere and by everyone there is no standard of quality or dimension.the name goes on before the quality goes in .keep that in mind and check everthing 3 times ,because i can garantee the one thing you overlook may be quite costly and frustrating in the end.but don't worrie live and learn and don't do it again.like i said before i figured out what caused my bearing falure so lets get the crank spinning and see if it all makes sence.where to start.
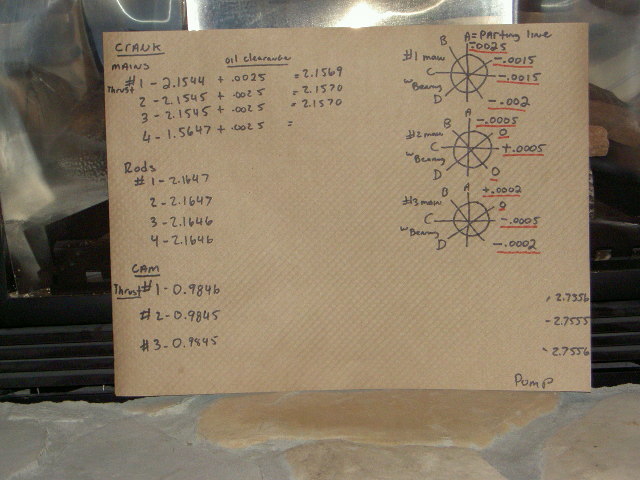
first we need to come up with some kind of dimension.so lets look at the chart .a good radial main bearing oil clearance for a vw motor is between .0025\"-.0030 \"so if we add that to the main bearing size we get 2.1569\" as a target.not deadly important as we are just getting started.

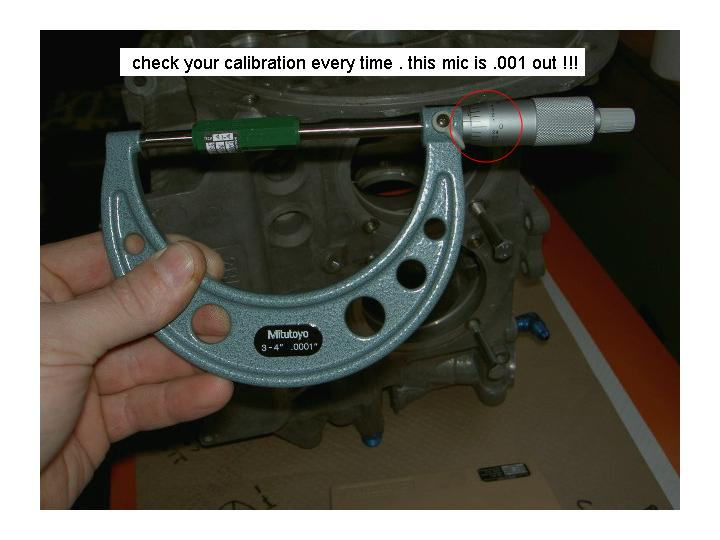
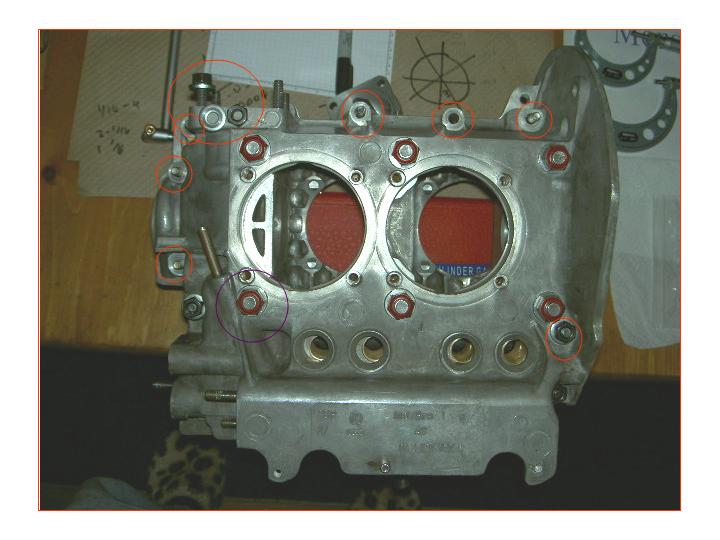
check you equipment,this mic is out .001\"

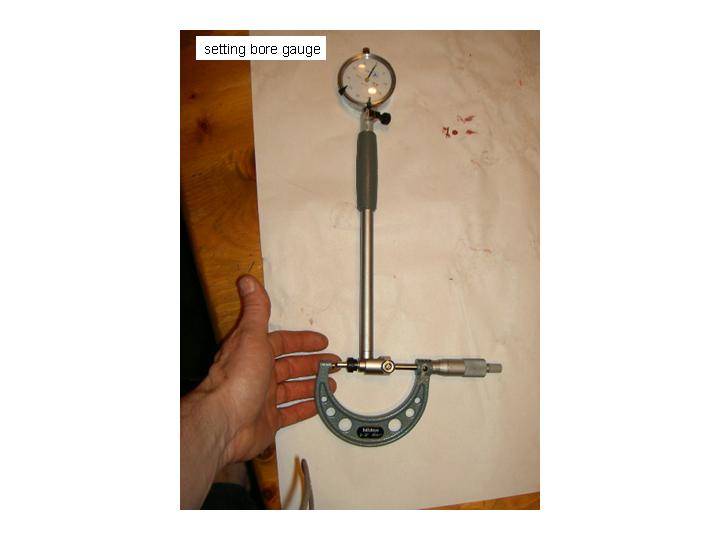
now set your bore guage.first set your mic to the target dimension .2.1569\"then set you bore gauge inbetween the two pads on the mic and rotate the dial to ZERO . you will need to rock the boreguage in the mic to get it dead on.once you try it you will know what i mean.i have made 2 marks one on either side of zero.left is black and right is red.so anything in the black is above the target dimension and anything in the red is less than the target dimension.

you need to understand that it is impossible to bolt a case together and torque it up and have the bores dead round .the main bearings need to be in the case to alighn the two haves .but you can take some rough measuremnets without bearings to see if the case looks close to specs.those dimensions are in the bently book.after rough measuring mine i new i was in trouble but getting closer to my answer of why my bearing failed.
since i never use the stock #3 bearing i seam to have a endless supplie of them so what i do is load up my case with those.yes #1/2/3 main bores are all the same dimension.
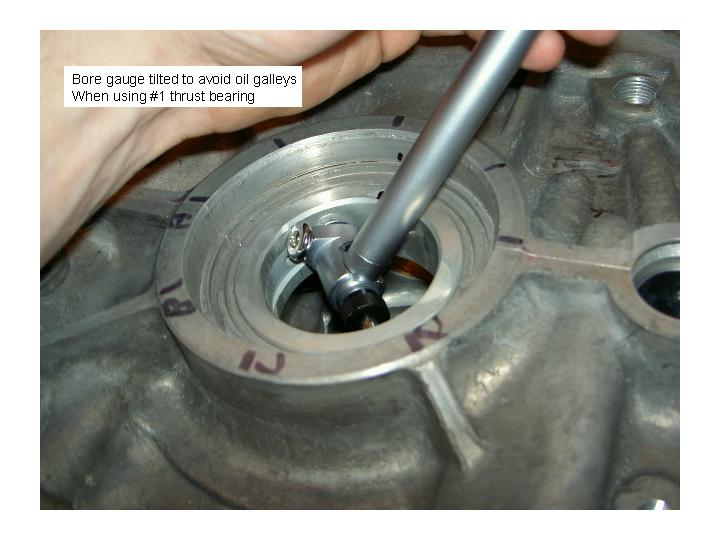
take a look at my # 3 bearing in the #1 bore you can see i marked 2 black area's on the bearing .those are there to remind me to watch out for the oil galleys in the bearing which will upset your measurments.you can also see the locations of measurement points a/b/c/d these are the 4 point i take measurments from remember them as i will refer to them many times.
what was done was to take a measurement at one point .loosen the case and rotate the bearing to the next point ,torque it up and remeasure.this was done for a 4 measurment referance points on all 4 bearings.CASE TORQUE IS HUGE AND WE WILL GET TO THAT LATER.

sound like alot of work but it goes alot quicker than you think.
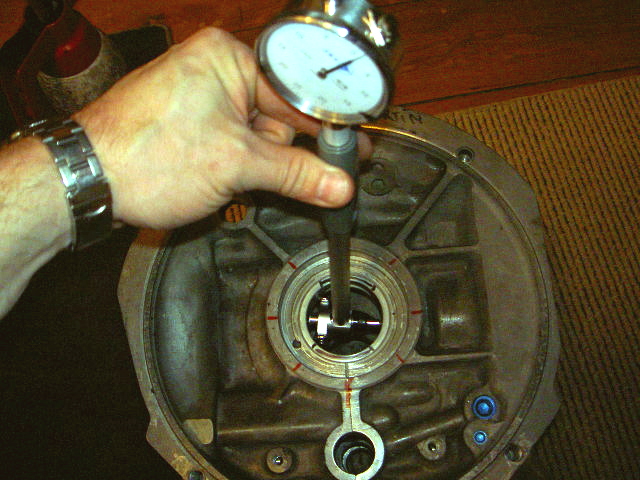
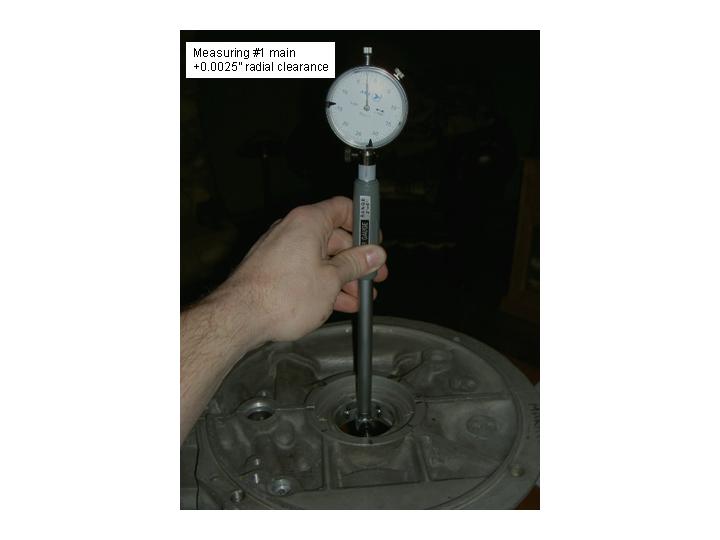
this is how you use a bore gauge ,it is self correcting because the 2 wheels keep it straight and all you have to do is rock it back and forth in the bearing bore and  watch the guage .you will figure it out quick once you try one.

this is what i ended up with

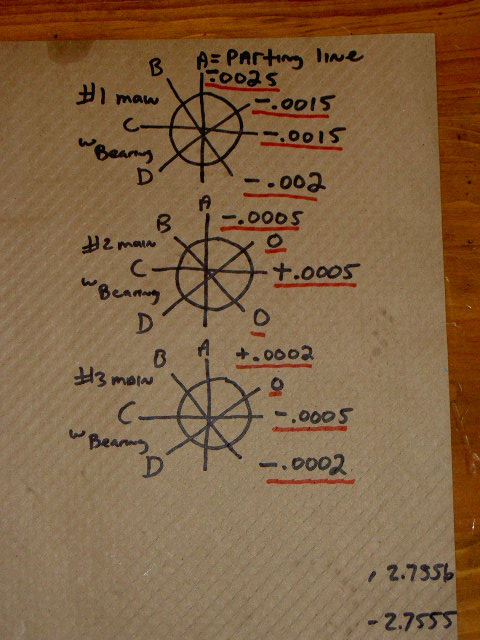
#2 and # 3 mains were almost dead on with less than 0.0005\" out of round !!!.but look at #1 main bearing.you can see that there is in the end no radial clearance.i could not even turn my crank with the case halves just resting together and the crank would be pinched and unable to turn.
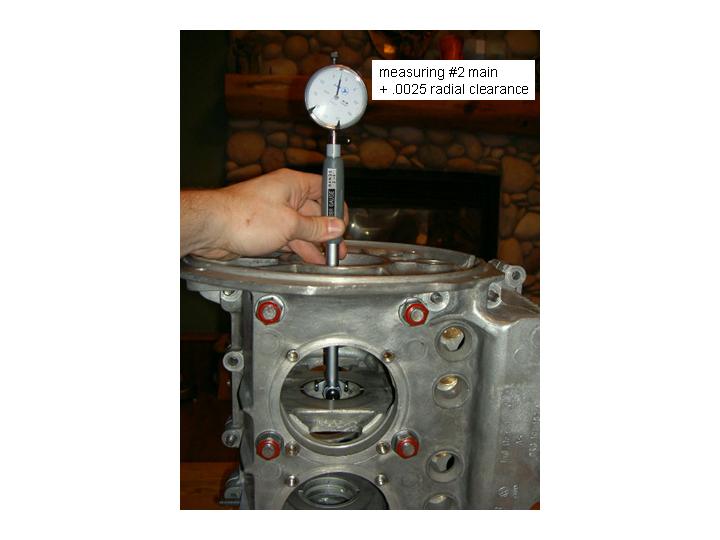
this is a better picture of the boregauge in use .don't let your guide wheels fall into the oil galleys,there is a way to do it i will show you later.

i was going to line bore my case myself but i figured i will send it to rocky
at-- rock jennings-- this guy know his stuff and has a excellent web site,shipping back and forth is cheap as well .under $40.00 cdn to send my case there from vancouver.rocky inspected my case and i told him to make the call.end result rebore to stock dimension #1 main bore only.he eneded up taking out about .0025\" with the cutters set at stock dimension.not bad if i remember that's how much it measured small !!.
take a look you can see the area's in black are where material was removed.


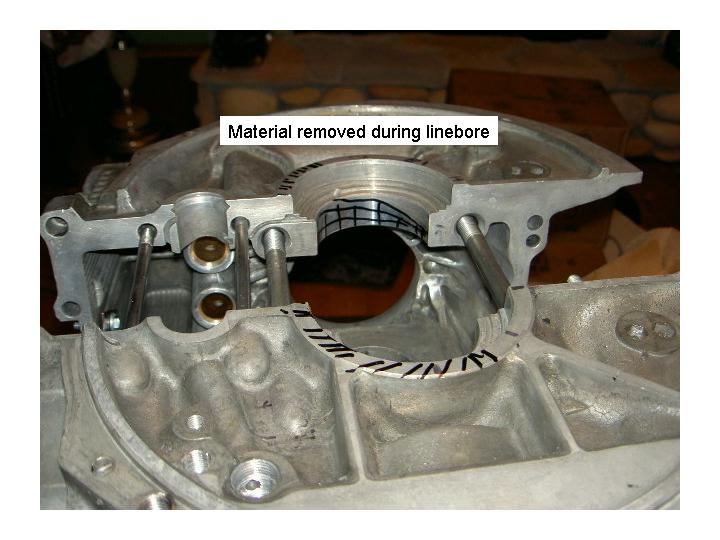
don't think its out of round trust me it's less than .0002\"out.
well with the case back and a quick check with the old #3 bearing in #1 main again it was time to install the main bearing set i would be using.
----missing picture here-------
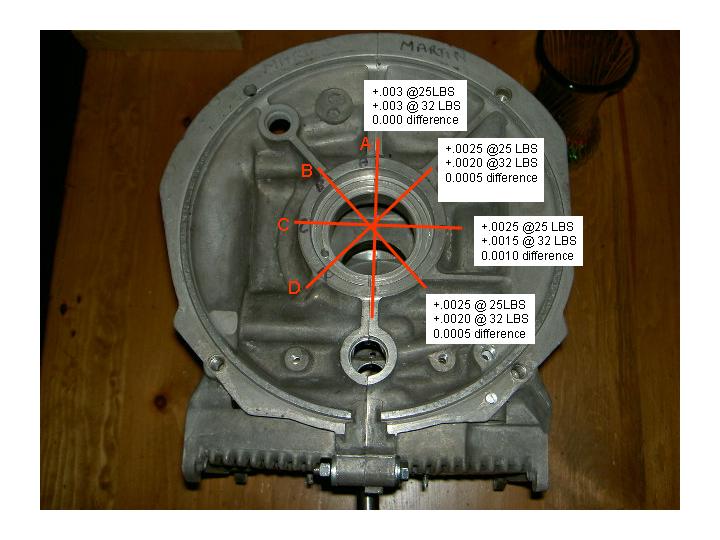
this i found very interesting and added more pieces to my puzzle of bearing falure.with the bore gauge set and case torqued  to 25 ft/lbs then later increased  to 32 ft/lbs.i took my measurments.but this time as i was using the bearing set i will run in the motor now bearings were not rotated or moved.this is how you sneak past the oil galleys

you can see that the dimension at 'A' parting line of the case does not change.with measuring point 'B' &'D' changing less than .0005\" but at measuring point 'C' there was a differance of .001\" wow!again note this is bearing radial clearance,take note.

i opend the case up and slipped my cam bearings in as well so i could measure them and again torque the case up to  25 ft/lbs on the 6 large nuts.wow!my measurements changed.so i marked them down and retorqued to 32 ft/lbs.take a look the dimension at 'A' stayed the same between the first round of measuring  and the second round of measuring but all the other dimensions changed by about .001\" smaller.as well as note the dimensions at both 25 and 32 ft/lbs changed the  same amount from the first set of measurements to the second set of measuremnets

maybe the #1 main by desigh is slower to compress than the other bearings.i tryied this again with another new #1 main bearing with almost the same results.can't explain it but take notice that you may want to run your bearing set through a few torque cycles to make sure you get a acurate radial oil clearance.
#1 radial oil clearance 0.0025\"

measuring #2 radial oil clerance 0.0025\"

measuring #3 radial oil clearance 0.003\"

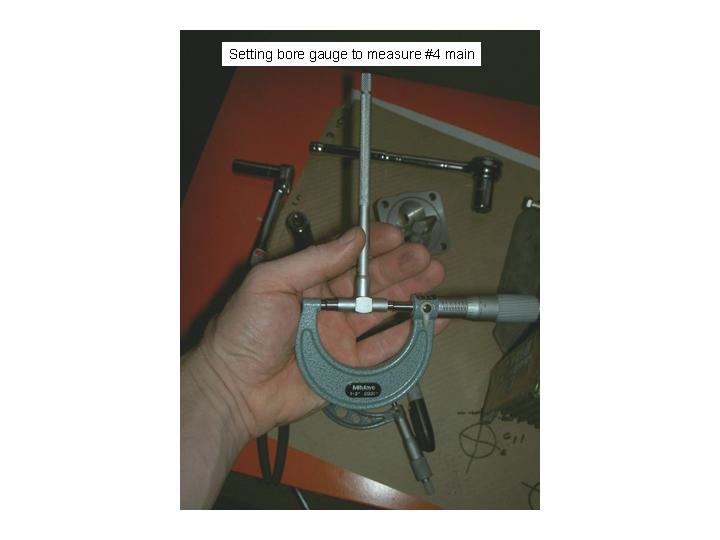
now it's a bit different to measure #4 main radial clearance .but this is what i like to do.first take your crank measurement of 1.5647\" and add say .001\" set your mic to that dimension 1.5657\" and insert your telescoping bore gauge between the two mic pads.and not the drag as you rock the boregauge between the centre point of the mic and remember that feeling

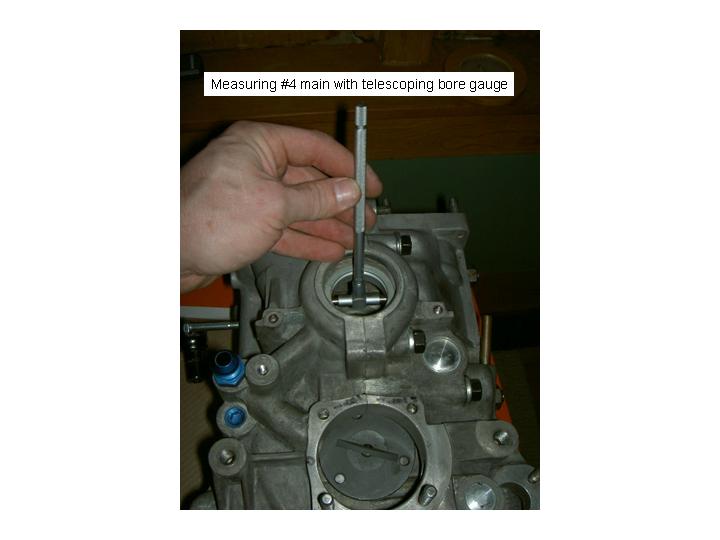
then take your set telescoping bore gauge and go to your case .insert the telescoping bore gauge into the bearing in all 4 positions and roll the gauge back and forth past centre and see if there was any contact.in this case there was not so i will increase another .001\" ,set mic at 1.5667\" and go through the whole procedure again.what i ended up with is a reading of between .0025\" and .0030\"radial oil clearance for th e#4 main bearing which is excellent.that same technic i just described will be used again later .

for kicks and gigles i oiled up all the main bearings and install the crank into the case and torqued it up.and she spins as free as could be !!!!!
--so the three questions are what caused the falure,what has been learned,what is being done to prevent it from happening again.
---the cause? is simple ,first don't believe everthing you read or heard.if you don't have first hand knowledge  of something you better learn quick and tripple check everthing if you do it.in the case of my case this is how it goes.i measured out my radial main bearing oil clearance and never checked it again, :( but now i know that my #1 main seams to compress a additional .001\" after a couple rounds of torquing.so right off the bat my .0025\" oil clearance dropped to .0015\".as you can see here my case has all the small outside bolts and the 6 inner bolts modified with a gene berg conversion,larger hardware.                                                                      

these instructions come with the parts and instructions about modifieing your engine case torque to increase case life .sounded good to me so i did it .hey it comes from gene berg so it must be good info.what they don't tell you is that the case deforms when more torque than the factory 25 ft/lbs is applied.that's my fault for not tripple checking that.so you can see by increasing my torque i most likely lost another .001 clearance .so you can see i was running a oval main bore and .0005\" radial clearance.no wonder things seized up.
whats learned ?run bearings through a few torque cycles,don't trust everthing you read or heard,and you can modifie your bearing clearance by modifing your case torque if needed.if you are going to run higher case torque get it linebored torqued to your specs
--prevension, correct measuring of all parts is #1 /modifications to crankshaft end play/ bearings and oil system all which will be covered later.
« Last Edit: December 28, 2008, 01:00:42 AM by jim martin »


the 'WOK" June 2006 Hot VW's feature car  9.830 sec at 143.44 mph.
Sponsored by : LUCAS OIL PRODUCTS   www.lucasoil.com
KROC head porting services
Dialedinp

Offline OUTKAST

  • *
  • Posts: 1908
  • Karma: 3
Jim Martin
« Reply #174 on: December 01, 2005, 02:53:56 AM »
You are Amazingly gifted, Never realized the amount of knowledge needed to do a proper build up or the potential variables to get caught up in .Your thread is extremely intresting and understandable Thanks for taking the time and effort to do this for the forum members .Great job  :)  

Offline jim martin

  • If something is priced to good to be true ,do yourself a favour. DONT be a IDIOT and BUY IT
  • *
  • Posts: 1406
  • Karma: 1
    • http://www.dialedinperformance.com
Jim Martin
« Reply #175 on: December 01, 2005, 08:40:02 PM »
Quote
You are Amazingly gifted, Never realized the amount of knowledge needed to do a proper build up or the potential variables to get caught up in .Your thread is extremely intresting and understandable Thanks for taking the time and effort to do this for the forum members .Great job  :)
thanks ,i'm glad you are finding it easy to follow .
this last section with some of the case variables is a bit much but i hope the info there will help someone else down the road


the 'WOK" June 2006 Hot VW's feature car  9.830 sec at 143.44 mph.
Sponsored by : LUCAS OIL PRODUCTS   www.lucasoil.com
KROC head porting services
Dialedinp

Offline jim martin

  • If something is priced to good to be true ,do yourself a favour. DONT be a IDIOT and BUY IT
  • *
  • Posts: 1406
  • Karma: 1
    • http://www.dialedinperformance.com
Jim Martin
« Reply #176 on: December 01, 2005, 09:41:42 PM »
well using the previous measurments from my new shadeck oil pump i set my mic and set the bore guage.the case was torqued up with all the bearings and the camshaft installed.it was time to measure out the oil pump bore.

since my pump was almost perfect and without a stock pump to take a measuremnt from i had to assume that the spec in the bently book would help give me a idea of pump to case clearance.my book says pump bore
is 2.7560\"-2.7580\"minus my 2.7555\" pump housing and i get a clearance of
0.0005\"-0.0025\"
so with this in mind i will need to clearance my housing to better fit my pump.

the area's in blue and the width will need a little clean up and be remeasured.
what i used was a flapper 220 grit sanding wheel mounted in a drill and was very carefull to keep it square to the pump bore.
now if i have the 6 large nuts torqued up but the outer bolts loose i can just about slid it in.it is tight and has about .001\" clearance all around it.
my concern was that since the case was not even at the parting line that installing the pump could toss it out of wack .with the pump in and the case fully torqued up cam and crank spin freely!!.
better check that oil seal as well .dont want a leak here.

you can see that my seal bore is well within limits and is good to go.
next is the camshaft and lifters .then its preassembley time!!!
« Last Edit: December 10, 2008, 11:28:13 PM by jim martin »


the 'WOK" June 2006 Hot VW's feature car  9.830 sec at 143.44 mph.
Sponsored by : LUCAS OIL PRODUCTS   www.lucasoil.com
KROC head porting services
Dialedinp

Offline Hansk

  • Full Member
  • Posts: 1638
  • Karma: 4
Jim Martin
« Reply #177 on: December 01, 2005, 10:24:30 PM »
Nice article Jim. Sure shows the way things should be done. Awesome!  Specially when using today's replacement and after market parts.  Like , having to get your brand new case re-machined to get it within tolerance.  I'm sure 99.999% of the motors never get checked out like this. If they were , the manufacturer would have a huge pile of them returned back to their door step.Maybe even through their front window [_[  
Big fat black fastback

Offline jim martin

  • If something is priced to good to be true ,do yourself a favour. DONT be a IDIOT and BUY IT
  • *
  • Posts: 1406
  • Karma: 1
    • http://www.dialedinperformance.com
Jim Martin
« Reply #178 on: December 02, 2005, 10:02:11 PM »
Quote
Nice article Jim. Sure shows the way things should be done. Awesome!  Specially when using today's replacement and after market parts.  Like , having to get your brand new case re-machined to get it within tolerance.
you have no choice but to do it this way .because there are alot of good quality parts out there and alot of poor quality parts out there being produced.it is up to you in the end to make them fit and work together. remember,on average these kind of motors are putting out on ONE cylinder what a complete stk motor put out on all its FOUR cylinders.
so assembley is going to be slow as there is alot of things that will creap up.now you can understand why a well assembled motor is expensive.labour intensive.
-what will i do next time,find a seasoned original case and get it machined .as i believe the quality of any new brazilian mag case is poor.or bite the bullet and get rocky to machine up a oxyboxer case which is probably the smartest move.


the 'WOK" June 2006 Hot VW's feature car  9.830 sec at 143.44 mph.
Sponsored by : LUCAS OIL PRODUCTS   www.lucasoil.com
KROC head porting services
Dialedinp

Offline jim martin

  • If something is priced to good to be true ,do yourself a favour. DONT be a IDIOT and BUY IT
  • *
  • Posts: 1406
  • Karma: 1
    • http://www.dialedinperformance.com
Jim Martin
« Reply #179 on: December 13, 2005, 11:30:06 PM »
well since the mystery of what caused my #1 bearing falure is solved and the crank spins very freely with the case torqued up its time to move on to the CAMSHAFT.
now since i have gone through 3 cam and lifter sets i can honestly say there is no for sure combination to use .so i'm officially done with steel lifters and have moved on to schubecks composite lifters.my advice to anyone using a performance camshaft is if you want to gamble with steel lifters just make sure that you buy products from the same maunfacture and follow there break in procedure,will cover that later on.
in order for any cam and lifter combination to work there has to be lifter rotation/lubrication.this is needed or the cam would contact the lifter in the same spot ever time and cam and lifter falure would be rapid.as well as the cam and lifter contact surface is lubricated from oil thrown of of the rotating crank[splash lube].that is why on a new steel lifter set it is important to keep the revs up around 1800 rpm .this makes sure that enough oil is splashed onto the lifter contact surface while the new cam and lifter work harden themselves .again we are at the break in thing again and that will be later.but for me i don't need to worrie about cam break in this time !!!!
in order to get the lifter to rotate there is 2 things needed lifter crown and camshaft taper.
camshaft taper is measured on the nose of all the cams lobes.the nose is the highest part of the cam or the pointy end if you like.easy to measure by setting your cam in v blocks or better yet a lathe.i have turned one of the lobes straight up and zero'd my dial indicator on one end of the lobes nose.

since my dial indicator is mounted on the floating table of the lathe it easy to slide the dial indicator along the nose of the cam lobe by cranking the table back and fourth.
this lobe has 0.001\" taper .not bad. should be between 0.001\"-0.002\" taper on all lobes .if not return your camshaft.CHECK ALL 4 LOBES !!!

with the lifters mounted in the lathe the dial indicator is zero'd on the edge of the lifter face to start.

now its easy because the dial indicator is mounted on the floating table you can sweep the dial indicator across the lifter face ,past centre and over to the other edge of the lifter face.
this lifter has a positive crown of 0.001\" -i would like to see more but schubecks says its enough with this lifter desighn. most of my other steel lifters had 0.002\"-0.0025\" positive crown.

take a look at this photo and you can see how it all works.with the combination of the cam lobe being offset to one side of the lifter centreline ,plus a taper on the lifter nose plus a crown on the lifter .evertime the camshafts lobe wipes across the lifter face it will make it rotate.now you can see why a motoroil with high shear resistance is so important to cam and lifter survival.

- with cam bearings mounted in the case halves its time to set end play first.you can see i'm running 0.003\" end play .

this was not the case right away .on first try the cam would hardly drop into the bearings so i had to hand clearance one of the thrust sides of the #1 thrust bearing.this is best done using a sheet of 400-600 grit emery paper on a glass surface.put some oil on it and use even /light presure and try 10 scrubes at a time and reclean the bearing and test end play again.remember there is 2 bearing halves to do so take your time and get them dead on.as well as make sure you take material off from the same sides [i always do the forward edge].its easy to forget which way the cam bearings fit into the case.

well with the end play set its time to oil the cam up and install it in the case and torque it up with the main bearings installed  to aide in case alignment.

now you can reach in a cylinder bore and try to rotate the cam.well it turned smooth but not as free as i liked so out she comes.
retorque the case and set the  telescoping bore gauge to the camshaft dimension recorded earlier and start increasing the telescoping bore gage .0005\" at a time until you get a slight drag as it rocks past centre.

i ended up with 0.9855\"so minus the cam journal measurment of 0.9846\" and that gives me a radial cam clearance of 0.0009 \"thats ok for a stock motor but not a performance motor .we need more oil cushion due to the loads being put on the cam from high rpm and valve spring pressures.
good thing to do at this point is to use plastigauge on all the cam journals to do two things.first see if you measured correctly as well as to see if its only one bearing tight.
lay a piece of the plastigauge on all 3 journals

retorque the case and don't turn the cam.unbolt and take a look.first you should have a even pattern on all the journals and use the paper pacage to check your measurements.mine were all good and look were pretty close at 0.001\".yes plastigauge does work.
-well i wanted more radial  clearance so i put the cam back into my lathe and using some lube and 3 stages of emery cloth 220-400-600 grit i took another .0009\" off all 3 journals which by the way took me to the stock min dimension of 0.9837\" so  my new camshaft radial oil clearance is 0.0018\"
remember my intial cam journal measurement of 0.9846\" if you compare that in a bently book you will see that this camshafts journal were ground larger than the factory max of 0.9842\".check all your parts!!!!!

while the cam was in the lathe i checked all the lobes for lift using the dial indicator.not bad 0.397\" lift will need that for later when settin up cam timing.

 -- these are SCHUBECKS          composite lifters repacaged by WEB-CAM camshafts
.AIRSPEED now stocks these lifters.first inspection there is a small oil hole just like the SCATT lube a lifters.just another way to keep oil on the lifterface during low rpm use/idle.so whats the big deal,weight around 51 grams/higher pushrod cup so you can use a shorter pushrod/never wear out ,swap all the cams you want and run any spring pressure!!and not worrie!!

measured all the lifters at 0.7465\".

set the telescoping bore guage and start testing for radial clearance. i ended up with 0.001\"-0.0015\" radial lifter clearance

i took the same measurment ofn the mic and slid it up the lifter ,you can see it doesn't look like it but there is a small radious starting a fare way down which will take some attention.

with out added clearance in the case to allow for the lifterradious you can see how high the lifter sits and at this point there is no way my cam would clear .these lifters really need to drop all the way in

so thanks to darren k . for lending me a slick tool he made to blend in a little more radious on the lifter bores which allows the new lifter to drop all the way in.well know one know's for sur but there is a rumour that these lifters are ok to run in a aluminum case but not in a magnesium case.schubecks told me it was ok .but i was concerned and have taken some info i've read and decided to rebush the lifter bore with silicon bronze.

the job was done by VALLEY VW. and even though there prices was fair the shipping was not and i even had issues with a the radious at the tops and slight tapper in a few bronze sleeves at the bottom .but shes all good now.so if you are going to run these in a mag case talk to my friend ROCKY at ROCK JENNINGS in walla walla washington he is now set up for doing single orders at any time with aprice of $150.00 us .take a look at his website its great.
-next is rods and bearings a look at full flow and case prep and its short block time.
« Last Edit: December 10, 2008, 11:32:00 PM by jim martin »


the 'WOK" June 2006 Hot VW's feature car  9.830 sec at 143.44 mph.
Sponsored by : LUCAS OIL PRODUCTS   www.lucasoil.com
KROC head porting services
Dialedinp